Give TinyUI the syntax of SwiftUI
Lesson 3: Result builders
You will buildA result builder, so that you can write Bordered { … } with if and for inside it — then a var body: some Widget, and finally the same card in real SwiftUI, running in the simulator.
TimeAbout 2 hours
WhyA SwiftUI body lists views one per line, with no commas and no return, and allows if and for in the middle of the list. That is not SwiftUI's doing. It is a Swift feature called a result builder, and today you write one. By the end you will have a type with a body, in a framework you made — and then the same type in SwiftUI itself.
Set up the project in Xcode
This is the third command-line project from scratch, and the last. It is named TinyUI, because by the end of today that is what it holds: a small framework with SwiftUI's syntax.
Open Xcode and choose File ▸ New ▸ Project… (⇧⌘N). If you are looking at the Welcome to Xcode window instead, its New Project menu offers the same choices.
Xcode 27 shows a short list of project kinds. Click Choose Template.
A sheet titled Choose a template for your new project appears. In the row of platforms at the top, click macOS. Under Application, select Command Line Tool. Click Next.
Fill in the options. Product Name:
TinyUI. Team: leave it as it is — a command-line program does not need one. Organization Identifier: the one you normally use, such ascom.yourname. Language: Swift. Click Next.Choose the folder to keep the project in — your
Developmentfolder, for example. Tick Create Git repository on my Mac or not, as you prefer. Click Create.The project window opens. In the Project navigator on the left, open the
TinyUIfolder and clickmain.swift. Below a comment that gives the file's name and today's date, Xcode has written:main.swift, as Xcode made itimport Foundation print("Hello, World!")Check that the run destination in the toolbar says My Mac, then choose Product ▸ Run (⌘R). The debug area opens at the bottom of the window, and its console shows:
Hello, World!
Program ended with exit code: 0
The last line comes from Xcode, not from the program: it says the program has finished, and
0means it finished without an error. If you cannot see the console, choose View ▸ Debug Area ▸ Activate Console (⇧⌘C).Now add a second file. With
main.swiftstill selected, choose File ▸ New ▸ File from Template… (⌘N). Under Source, select Swift File. Click Next.Name it
Builder, leave the other settings as they are, and click Create. The file appears besidemain.swiftand opens with a comment and one line of code:import Foundation. Leave that line where it is.Today builds on yesterday's widgets, so bring that file across. With
main.swiftselected, choose File ▸ Add Files to “TinyUI”… (⌥⌘A). Find yesterday's project, selectWidgets.swiftinside itsWidgetsfolder, and click Add. Xcode then asks how to add it: for Action choose Copy files to destination, so that TinyUI gets its own copy, and click Finish.If you do not have yesterday's file: make a new Swift file named
Widgetsinstead, and replace everything in it with thisimport Foundation protocol Widget { func render() -> [String] // a widget draws itself as lines of text } struct Text: Widget { let string: String init(_ string: String) { self.string = string } func render() -> [String] { [string] } } func show(_ widget: some Widget) { print(widget.render().joined(separator: "\n")) } struct Column<Top: Widget, Bottom: Widget>: Widget { let top: Top let bottom: Bottom init(_ top: Top, _ bottom: Bottom) { self.top = top self.bottom = bottom } func render() -> [String] { top.render() + bottom.render() } } struct Bordered<Content: Widget>: Widget { let content: Content init(_ content: Content) { self.content = content } func render() -> [String] { let lines = content.render() let width = lines.map(\.count).max() ?? 0 let edge = "+" + String(repeating: "-", count: width + 2) + "+" let rows = lines.map { "| " + $0.padding(toLength: width, withPad: " ", startingAt: 0) + " |" } return [edge] + rows + [edge] } } func tripCard() -> some Widget { Bordered(Column(Text("Seattle"), Text("Aug 22 - Sep 3"))) } func badge(isNew: Bool) -> some Widget { if isNew { return Either<Text, Bordered<Text>>.first(Text("NEW")) } else { return Either<Text, Bordered<Text>>.second(Bordered(Text("seen"))) } } struct AnyWidget: Widget { private let renderer: () -> [String] init(_ widget: some Widget) { renderer = widget.render } func render() -> [String] { renderer() } } enum Either<First: Widget, Second: Widget>: Widget { case first(First) case second(Second) func render() -> [String] { switch self { case .first(let widget): widget.render() case .second(let widget): widget.render() } } }Check that it arrived.
tripCard()is one of yesterday's functions:Inmain.swift, replace everything belowimport Foundationwithshow(tripCard())Run it (⌘R). The console shows
+----------------+
| Seattle        |
| Aug 22 - Sep 3 |
+----------------+
Program ended with exit code: 0
The new code for today goes in Builder.swift.
The goal
Yesterday, building a card looked like this: Bordered(Column(Text("Seattle"), Text("Aug 22 - Sep 3"))). It works, but it reads inside-out, and Column can only hold two things. Today's goal is to write this instead, and have it mean the same thing:
Bordered {
    Text("Seattle")
    Text("Aug 22 - Sep 3")
}A builder that combines statements
A result builder is a type marked @resultBuilder with static methods whose names begin with build. The compiler calls those methods to combine the statements in a block. Start with the two that handle a plain list:
Builder.swift@resultBuilder
enum WidgetBuilder {
static func buildPartialBlock<W: Widget>(first: W) -> W {
first
}
static func buildPartialBlock<A: Widget, B: Widget>(accumulated: A, next: B) -> Column<A, B> {
Column(accumulated, next)
}
}And a function that accepts a block built this way. The attribute @WidgetBuilder on the parameter is what switches the feature on:
Builder.swiftfunc stack<Content: Widget>(@WidgetBuilder _ content: () -> Content) -> Content {
content()
}main.swift, replace everything below import Foundation withlet list = stack {
Text("Seattle")
Text("Vancouver")
Text("Victoria")
}
show(list)
print(type(of: list))Run it (⌘R). The console shows
Seattle
Vancouver
Victoria
Column<Column<Text, Text>, Text>
Program ended with exit code: 0Three widgets, no commas, no return. And the last line shows what the block became: Column<Column<Text, Text>, Text>. It is not an array. It is one value, of a nested type.
It rewrote your block into calls on the builder. The first statement goes to buildPartialBlock(first:). Each later statement goes to buildPartialBlock(accumulated:next:), together with everything gathered so far. You could write the result by hand, and it prints exactly the same thing:
main.swift, replace everything below import Foundation withlet list = stack {
let v0 = WidgetBuilder.buildPartialBlock(first: Text("Seattle"))
let v1 = WidgetBuilder.buildPartialBlock(accumulated: v0, next: Text("Vancouver"))
let v2 = WidgetBuilder.buildPartialBlock(accumulated: v1, next: Text("Victoria"))
return v2
}
show(list)
print(type(of: list))Run it (⌘R). The console shows
Seattle
Vancouver
Victoria
Column<Column<Text, Text>, Text>
Program ended with exit code: 0That hand-written version is what the builder saves you from writing.
Builder syntax on Bordered
Give Bordered a second initializer that accepts a builder block:
Builder.swiftextension Bordered {
init(@WidgetBuilder content: () -> Content) {
self.init(content())
}
}main.swift, replace everything below import Foundation withshow(Bordered {
Text("Seattle")
Text("Aug 22 - Sep 3")
})Run it (⌘R). The console shows
+----------------+
| Seattle |
| Aug 22 - Sep 3 |
+----------------+
Program ended with exit code: 0That is the goal from step 2, working.
if inside a block
Try to show a line only when a condition is true:
main.swift instead, below import Foundationlet isFavorite = true
show(Bordered {
Text("Seattle")
if isFavorite {
Text("* favorite")
}
})It does not compile. Xcode reports
type '() -> ()' cannot conform to 'Widget'The message is not helpful, but the cause is simple. Your builder has no method for handling an if, so the compiler cannot treat the block as a builder block at all.
The method it needs is buildOptional. An if with no else either produces a widget or produces nothing — in other words, an optional widget. So two things are needed: the builder method, and a way for an optional widget to draw itself (as nothing, when it is nil).
Builder.swiftextension Optional: Widget where Wrapped: Widget {
func render() -> [String] { self?.render() ?? [] }
}Builder.swift, replace WidgetBuilder with this@resultBuilder
enum WidgetBuilder {
static func buildPartialBlock<W: Widget>(first: W) -> W {
first
}
static func buildPartialBlock<A: Widget, B: Widget>(accumulated: A, next: B) -> Column<A, B> {
Column(accumulated, next)
}
static func buildOptional<W: Widget>(_ widget: W?) -> W? {
widget
}
}main.swift, replace everything below import Foundation withfor isFavorite in [true, false] {
show(Bordered {
Text("Seattle")
if isFavorite {
Text("* favorite")
}
})
}Run it (⌘R). The console shows
+------------+
| Seattle |
| * favorite |
+------------+
+---------+
| Seattle |
+---------+
Program ended with exit code: 0The first card has the extra line and the second does not.
if with else
With an else, the two branches can be different types. You solved that problem yesterday with Either. The builder method for it is buildEither, and there are two of them — one for each branch:
Builder.swift, replace WidgetBuilder with this@resultBuilder
enum WidgetBuilder {
static func buildPartialBlock<W: Widget>(first: W) -> W {
first
}
static func buildPartialBlock<A: Widget, B: Widget>(accumulated: A, next: B) -> Column<A, B> {
Column(accumulated, next)
}
static func buildOptional<W: Widget>(_ widget: W?) -> W? {
widget
}
static func buildEither<First: Widget, Second: Widget>(first: First) -> Either<First, Second> {
.first(first)
}
static func buildEither<First: Widget, Second: Widget>(second: Second) -> Either<First, Second> {
.second(second)
}
}main.swift, replace everything below import Foundation withfor isBooked in [true, false] {
show(Bordered {
Text("Seattle")
if isBooked {
Text("booked")
} else {
Bordered(Text("not booked yet"))
}
})
}Run it (⌘R). The console shows
+---------+
| Seattle |
| booked |
+---------+
+--------------------+
| Seattle |
| +----------------+ |
| | not booked yet | |
| +----------------+ |
+--------------------+
Program ended with exit code: 0One branch is a Text, the other a Bordered<Text>, and the block still produces a single type. Yesterday you wrote Either<…>.first(…) by hand. Now the builder writes it for you — which is exactly what SwiftUI does with _ConditionalContent.
for loops
A loop produces a list of widgets that all have the same type. Add a widget to hold such a list, and the builder method buildArray:
Builder.swiftstruct Repeated<Item: Widget>: Widget {
let items: [Item]
func render() -> [String] { items.flatMap { $0.render() } }
}Builder.swift, replace WidgetBuilder with this@resultBuilder
enum WidgetBuilder {
static func buildPartialBlock<W: Widget>(first: W) -> W {
first
}
static func buildPartialBlock<A: Widget, B: Widget>(accumulated: A, next: B) -> Column<A, B> {
Column(accumulated, next)
}
static func buildOptional<W: Widget>(_ widget: W?) -> W? {
widget
}
static func buildEither<First: Widget, Second: Widget>(first: First) -> Either<First, Second> {
.first(first)
}
static func buildEither<First: Widget, Second: Widget>(second: Second) -> Either<First, Second> {
.second(second)
}
static func buildArray<W: Widget>(_ widgets: [W]) -> Repeated<W> {
Repeated(items: widgets)
}
}main.swift, replace everything below import Foundation withlet stops = ["Pike Place", "Alki Beach", "Tiger Mountain"]
show(Bordered {
Text("Seattle")
for stop in stops {
Text("- " + stop)
}
})Run it (⌘R). The console shows
+------------------+
| Seattle |
| - Pike Place |
| - Alki Beach |
| - Tiger Mountain |
+------------------+
Program ended with exit code: 0A body, like SwiftUI's
The last piece makes TinyUI look like the real thing. Define a protocol for widgets that are built out of other widgets. Such a widget only has to provide a body; rendering is handled for it:
Builder.swiftprotocol Component: Widget {
associatedtype Body: Widget
@WidgetBuilder var body: Body { get }
}
extension Component {
func render() -> [String] { body.render() }
}Now write one:
Builder.swiftstruct TripCard: Component {
let city: String
let isFavorite: Bool
let stops: [String]
var body: some Widget {
Bordered {
Text(city)
if isFavorite {
Text("* favorite")
}
for stop in stops {
Text("- " + stop)
}
}
}
}main.swift, replace everything below import Foundation withlet card = TripCard(city: "Seattle", isFavorite: true, stops: ["Pike Place", "Alki Beach"])
show(card)
print(type(of: card.body))Run it (⌘R). The console shows
+--------------+
| Seattle |
| * favorite |
| - Pike Place |
| - Alki Beach |
+--------------+
Bordered<Column<Column<Text, Optional<Text>>, Repeated<Text>>>
Program ended with exit code: 0Look at TripCard. A struct with some properties, and var body: some Widget containing a block with an if and a for in it. Change the word Widget to View and that is a SwiftUI view.
Two details. First, you did not write @WidgetBuilder on body. It is on the protocol's requirement, and every conforming type inherits it — this is why you never write @ViewBuilder on a SwiftUI body. Second, the last line of output is the full type of that body. It describes the entire structure of the card. That long type is what some Widget is hiding, and it is what SwiftUI compares between updates.
The same card in real SwiftUI
Everything so far printed text. To finish, write the same card with the real framework and run it on an iPhone simulator. It is your first SwiftUI project, so set it up from scratch as well. The steps are the ones you know, with a different template:
Choose File ▸ New ▸ Project… (⇧⌘N), then click Choose Template.
In the row of platforms at the top, click iOS. Under Application, select App. Click Next.
Fill in the options. Product Name:
SwiftUICard. Team: leave it as it is — the simulator does not need one. Organization Identifier: as before. Interface: SwiftUI. Language: Swift. Testing System: None. Storage: None. Click Next.Choose the folder, and click Create.
Xcode opens
ContentView.swift. The project has two Swift files.SwiftUICardApp.swiftholds the type marked@main, which is where the program starts.ContentView.swiftis the screen it shows, and so far it is whatever the template wrote:ContentView.swift, as Xcode made itimport SwiftUI struct ContentView: View { var body: some View { VStack { Image(systemName: "globe") .imageScale(.large) .foregroundStyle(.tint) Text("Hello, world!") } .padding() } } #Preview { ContentView() }Run it before changing anything. In the toolbar, open the run destination menu and pick an iPhone simulator — iPhone 17, for example. Choose Product ▸ Run (⌘R). The Simulator app starts, and after a moment it shows this:

The template's screen, running in the iPhone 17 simulatorScreenshot · iPhone 17, iOS 27.0
Now replace everything in ContentView.swift with your TripCard, written as a SwiftUI view:
ContentView.swift withimport SwiftUI
struct TripCard: View {
let city: String
let isFavorite: Bool
let stops: [String]
var body: some View {
VStack(alignment: .leading) {
Text(city)
if isFavorite {
Text("* favorite")
}
ForEach(stops, id: \.self) { stop in
Text("- " + stop)
}
}
.padding()
.border(.primary)
}
}
struct ContentView: View {
var body: some View {
let card = TripCard(city: "Seattle", isFavorite: true, stops: ["Pike Place", "Alki Beach"])
card
.onAppear { print(type(of: card.body)) }
}
}
#Preview {
ContentView()
}Set it beside the TripCard from step 8. The properties are the same. Component became View, and some Widget became some View. Bordered { … } became a VStack with two modifiers after it, .padding() and .border(). The if did not change at all. The for loop became a ForEach, because SwiftUI's builder has no buildArray method. If you leave the for in, the error is:
closure containing control flow statement cannot be used with result builder 'ViewBuilder'Run it (⌘R):
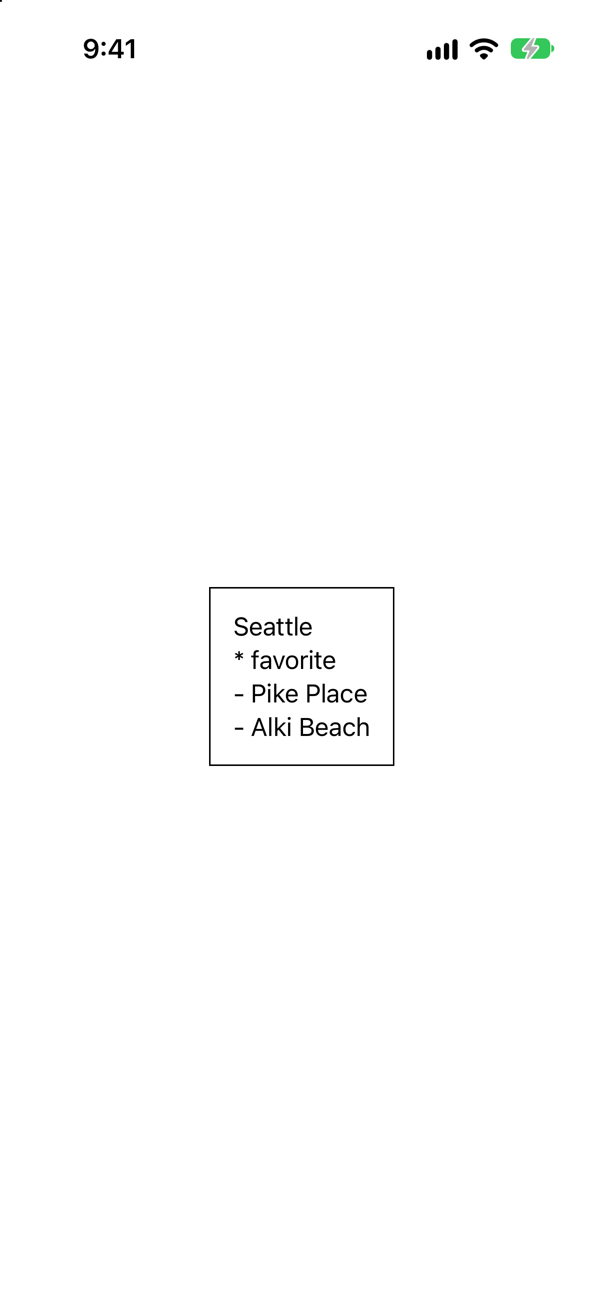
The last lines of ContentView print the type of the card's body, as you did in step 8. Look in Xcode's console:
ModifiedContent<ModifiedContent<VStack<TupleView<(Text, Optional<Text>, ForEach<Array<String>, String, Text>)>>, _PaddingLayout>, _OverlayModifier<_ShapeView<_StrokedShape<_Inset>, HierarchicalShapeStyle>>>Read that type from the inside out. TupleView holds the three things in the block: it is your Column. The second of them is Optional<Text>: that is the if. The third is a ForEach: your Repeated. And each modifier wrapped everything before it in a ModifiedContent, the way Bordered wrapped its content. The real framework is made of the pieces you built this week.
Now read SwiftUI again
Everything you built over three days has a counterpart in SwiftUI:
| What you built | SwiftUI's version |
|---|---|
Widget | View |
Component and its body | View and its body |
WidgetBuilder | ViewBuilder |
Column<A, B> | TupleView |
Either<First, Second> | _ConditionalContent |
Optional as a widget | Optional as a view |
Repeated | ForEach |
Bordered<Content> | ModifiedContent, which is what modifiers such as .padding() and .border() return |
AnyWidget | AnyView |
Ref (day 1) | Binding |
Stored (day 1) | @AppStorage |
A piece of history that now makes sense: early versions of SwiftUI allowed at most ten views in one block. The builder had a separate method for two views, for three, and so on up to ten — and no more. Swift 5.9 added a feature (parameter packs) that removed the limit, and Xcode 27 adds @ContentBuilder, which makes large blocks compile faster.
What you built today
WidgetBuilder, a result builder that handles plain lists,if,if/else, andfor.Component, a protocol with abody— TinyUI'sView.TripCard, written the way you would write a SwiftUI view — and then written as one, and run.
Tomorrow is Sunday, with two lessons: macros — what @Observable really generates — and the rest of what changed in Swift since 2016. Then the first interview problem.
The finished projects
Stuck, or want to compare with your own? These are the projects as they stand at the end of today, built and run before they were put here.
- TinyUI.zip — unzip it, then open
TinyUI.xcodeprojin Xcode. - SwiftUICard.zip — unzip it, then open
SwiftUICard.xcodeprojin Xcode.
Flash cards
15 cards for today, each labelled with its topic. 8 ask how you would write something; the other 7 are trick questions, written to catch a misunderstanding. Answer in your head first, then tap the card.
Syntax · Result buildersDeclare a result builder.
@resultBuilder
enum WidgetBuilder {
    static func buildPartialBlock<W: Widget>(first: W) -> W {
        first
    }

    static func buildPartialBlock<A: Widget, B: Widget>(accumulated: A, next: B) -> Column<A, B> {
        Column(accumulated, next)
    }
}Mark an enum or struct @resultBuilder and give it static build… methods. buildPartialBlock(first:) and buildPartialBlock(accumulated:next:) are enough for a plain list of statements.
Syntax · Result buildersWrite a function that takes a builder closure.
func stack<Content: Widget>(@WidgetBuilder _ content: () -> Content) -> Content {
    content()
}Write the builder's name before the parameter: @WidgetBuilder _ content: () -> Content.
Syntax · Result buildersWrite an initializer that takes a builder closure.
extension Bordered {
    init(@WidgetBuilder content: () -> Content) {
        self.init(content())
    }
}The same attribute, on a parameter of an initializer. This is what makes Bordered { … } possible.
Syntax · Control flow in buildersMake if (without else) work inside a builder block.
extension WidgetBuilder {
static func buildOptional<W: Widget>(_ widget: W?) -> W? {
widget
}
}
extension Optional: Widget where Wrapped: Widget {
    func render() -> [String] { self?.render() ?? [] }
}Add buildOptional. Its result is an optional widget, so Optional has to conform to Widget as well.
Syntax · Control flow in buildersMake if/else work inside a builder block.
extension WidgetBuilder {
static func buildEither<First: Widget, Second: Widget>(first: First) -> Either<First, Second> {
.first(first)
}
static func buildEither<First: Widget, Second: Widget>(second: Second) -> Either<First, Second> {
.second(second)
}
}Add the two buildEither methods. Both return the same type, Either<First, Second>, so the block still produces one type.
Syntax · Control flow in buildersMake for loops work inside a builder block.
extension WidgetBuilder {
static func buildArray<W: Widget>(_ widgets: [W]) -> Repeated<W> {
Repeated(items: widgets)
}
}Add buildArray. It receives one result for each pass through the loop.
Syntax · Result buildersDeclare a protocol whose body is a builder block in every conforming type.
protocol Component: Widget {
    associatedtype Body: Widget
    @WidgetBuilder var body: Body { get }
}

extension Component {
    func render() -> [String] { body.render() }
}Put the builder attribute on the protocol's requirement. Conforming types inherit it — which is why you never write @ViewBuilder on a SwiftUI body.
Trick question · Result buildersInside a builder block, can you write let city = "Seattle" and then use city?
show(stack {
    let city = "Seattle"
    Text(city)
    Text(city.uppercased())
})
Yes. Declarations are allowed and are left alone. Only the expressions are collected and handed to the builder.
Trick question · Result buildersWhat happens if you write an explicit return inside a builder block?
show(stack {
    Text("Seattle")
    return Text("Vancouver")
})
The builder is switched off for that block. It becomes an ordinary closure, so only the returned value is used. This prints just Vancouver — the first line is thrown away, with nothing worse than a warning.
Trick question · Result buildersA builder block lists three Text widgets. Is the result an array of three?
No. It is a single value of a nested type: Column<Column<Text, Text>, Text>. Each statement is folded into the result of the ones before it.
Trick question · Control flow in buildersif isFavorite { Text("* favorite") } — when isFavorite is false, is that widget simply missing from the result?
No. The result's type is Column<Text, Optional<Text>> whether the condition is true or false. The slot is always there; it just holds nil. This is how SwiftUI keeps a view's position — its identity — stable while a condition changes.
Trick question · Result buildersDoes TripCard's body need @WidgetBuilder written in front of it?
No. The attribute is on the protocol's body requirement, and every conforming type inherits it. SwiftUI's View.body works the same way with @ViewBuilder.
Trick question · Control flow in buildersYour builder supports for. Does it support while?
var count = 0
show(stack {
    while count < 2 {
        Text("again")
        count += 1
    }
})
No. closure containing control flow statement cannot be used with result builder 'WidgetBuilder' Result builders have methods for if, if/else, switch and for. There is none for while.
Syntax · SwiftUI itselfIn SwiftUI, show one Text for each string in an array.
import SwiftUI

struct StopList: View {
    let stops: [String]

    var body: some View {
        VStack(alignment: .leading) {
            ForEach(stops, id: \.self) { stop in
                Text("- " + stop)
            }
        }
    }
}
ForEach is a view that holds the repeated views — SwiftUI's version of your Repeated. id: \.self says how to tell the elements apart: here, each string identifies itself.
Trick question · SwiftUI itselfTinyUI lets you write a for loop inside a builder block. Does SwiftUI?
import SwiftUI

struct StopList: View {
    let stops: [String]

    var body: some View {
        VStack(alignment: .leading) {
            for stop in stops {
                Text("- " + stop)
            }
        }
    }
}
No. closure containing control flow statement cannot be used with result builder 'ViewBuilder' SwiftUI's ViewBuilder has methods for if and if/else, but no buildArray. Use ForEach instead.